Home Network Setup: How To Get The Best From Your Broadband
If you’ve just upgraded your broadband, or just had a connection installed for the first time, you’ll need to set up and install your home network.
If you’ve had fibre optic broadband installed, it’s likely that an engineer has put in the line and the cabling you’ll need, which is the really tough bit! In this guide, we’ll talk you through every aspect of home network setup. From plugging in your router for the first time, to setting up security settings.
Connecting Your ADSL Or Cable Router (from the ISP or your own)
Routers are the portal between your home network and the internet. A router will also let all of your devices on the network communicate with each other. So they are pretty important!
Most routers provided by ISPs (Internet Service Providers) are designed to be very easy to set up. If you have an ADSL connection you’ll need to set your router up next to a phone port and a power outlet.
Newer routers provided by ISPs will let you connect your phone directly to the router, but older models may require something called a microfilter.
Microfilters are devices that work specifically with ADSL broadband and allow the broadband connection to work at the same time as the telephone service. Without a microfilter you can experience noise and faults on your telephone line.

You connect the phone and the router to the microfilter and then plug that into the telephone socket. Once your router is plugged into a power outlet, you should be good to go.
Connecting a fibre optic or cable router is slightly different in some respects. If you have had, for example, Virgin Media installed, an engineer will have installed all the cabling and connected the router and phone for you. Cable routers also do not need microfilters, so the setup process is actually much easier.
Access Your ADSL Or Cable Routers’ Interface
Depending on when your line has been activated, your broadband connection may be live straight away. But before you start watching a boxset on Netflix it’s important to take care of a few essentials.
Most routers have default IPs which you can use to access the router's’ settings console. For example, your router may have a default IP like 192.168.1.1. Here are the IP addresses for all the most popular routers
|
Manufacturer & ISP |
IP Address |
|
Thomson (PlusNet) |
192.168.1.1 |
|
|
192.168.1.254 |
|
|
192.168.100.1 |
|
Netgear (Sky & Virgin Media) |
192.168.0.1 |
|
|
192.168.0.227 |
|
Huawei (BT) |
192.168.1.1 |
|
|
192.168.8.1 |
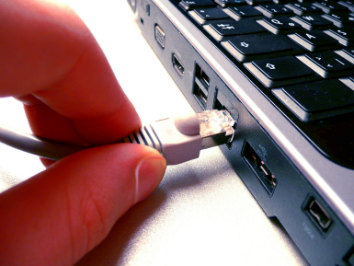
To access the router's interface you will need to connect directly to the router via an Ethernet cable with your laptop or desktop PC. Once you do this, open your internet browser and type in the default IP address for your router. Once you’ve done that you should see your router’s management console.
Here you will have to login and that is thankfully pretty easy. Most users have ‘admin’ as a username and as a password. If that is not correct, your router should have a sticker on it with a default username and password. Once you’ve entered that, you’re in. But make sure you change this password after you’ve logged in. Some routers will ask you to do so, but some won’t.
The steps for this process are exactly the same for cable routers. Virgin Media Super Hubs are manufactured by Netgear, so default IP address from the list above, or on the sticker on the router, will give you access to the management console. Once you’ve entered the default password, you’ll be prompted to change it to a new password, so make sure you pick something secure.
Tighten Up Your Security Settings and Reset Any Default Passwords
Once you are in the management console, it’s of vital importance to get your security settings right. If you don’t an unscrupulous neighbour or passer-by could steal your bandwidth or even your personal details!
We have already covered how you should change the default administrator password, but there are a number of other things you should be altering in the management console of your new router. Unfortunately we’re getting into advanced territory here and router interfaces vary, but if you want a secure home network it’s best to delve into this as much as you possibly can.
The first thing you should do, after changing the default passwords, is to change the router's’ default SSID. The SSID is the name of your network that you would see on your devices, such as smartphones, games consoles, desktop PCs and laptops. If you use a unique name for your network, it avoids confusion with other networks in the area. For example, if your neighbours have the same ISP as you, their SSID may be very similar to yours.
After you’ve changed your SSID, the next step in your home network setup should make your network even more secure. Most routers have default security settings, but if you want added peace of mind you should use WPA/WPA2 security.
WPA security requires any device attempting to connect to your network to use a specific key or password. You set up this key or password within your router’s management interface. You can usually find this setting in the security menus of most modern routers.
You’ll need to think of a relatively long and unique password or phrase. Some routers vary, but most will allow you to create a password or phrase that’s anything from 8 characters to 63 characters long. You must be sure to select a password or phrase that’s unique and impossible to guess. There are various tools which will help you create unique password strings - Apple devices in particular can provide suggested passwords. However, if you are stuck and want to use the title of your favourite film, make sure you throw in some random numbers so it can’t be guessed.
Once you’ve changed these settings, disconnect your laptop or PC and reboot it. Once you’ve rebooted you should see that your network now has a new unique name.
Access Settings
Now that you have a more secure home network setup than you would have if you trusted your ISPs defaults, it’s time to dig into the types of access users on your network have. As most people now have a smartphone, tablet or both you may be asked for your WiFi password by guests who visit your house. This is obviously a bit of a mine field but if you set up your home network correctly, there is no way an unscrupulous guest can use your network to download something they shouldn’t. If you have young children, you can also use these settings to stop them from accessing content that may be inappropriate.
Guest Networks
If you have visitors, it’s possible to provide internet access to them without letting them have your primary router password. All you have to do is set up a ‘guest’ network. A guest network creates an additional SSID for your house guests to log into and get online. The best thing about a guest network is that users who are on it will not be able to access any shared devices such as printers or shared files. You can also restrict access to certain types of websites and limit the type of data they can download.

Most modern routers support guest networking in their management interfaces. Simply log into your router using the steps outlined above. Once in you should be able to find you guest network settings quite easily.
Once you’ve gone through the steps to create a guest network, which is sometimes as simple as ticking a box saying ‘enable guest network’ you will need to name it so users will be able to log into it. We’d suggest using the same SSID as the main network but append a ‘_guest’ to it. So, for example, your guest network could be called ‘my_network_guest’.
If you have a dual-band router, such as a Virgin Media Superhub 2, you will also have to have an SSID for both 2.4GHz and 5GHz connections. Some dual-band routers will offer this by default, so you may not have to worry too much. It is definitely worth your time to look into this if your router does not create dual-band SSIDs for guest networks.
As before with your main network, you need to create a very strong network passphrase that you can give to your house guests when they need to get online. If you think guests may want to use your laptop or PC, it is a good idea to set up guest accounts on your devices that automatically connect to the guest network. This is relatively easy to do on both Windows and Mac machines.
What are ‘QoS settings’ and how do they work?
QoS stands for ‘Quality of Service’ and it’s a feature commonly found on some modern routers. QoS prioritizes different sorts of data coming from the internet to your router. Most routers have default settings to help you set this up. When you log into your router and go to the QoS menu you will usually see drop down boxes that let you pick from a number of different services. So, for example, if you have an Xbox and you’re a gamer you can prioritize data from Xbox Live over other data.

QoS is really useful if you stream movies online from services such as Netflix. For example, with QoS you can specify that when you are using Netflix, all other traffic is low priority, so you could get a more seamless streaming experience.
Routers also allow you to make up your own QoS rules for different services and add them to the list. Using this system, you can also prioritise devices that are connected to the router. So if you have your PlayStation 4 connected to the router via an ethernet cable, you can specify that the port the PS4 is plugged into takes priority over other traffic. It’s a useful feature that helps you ensure a good experience for your primary devices.
How to help keep your children safe online
It’s the responsibility of every parent to educate their children on what they should and should not do online. If your kids are old enough to log into the internet unsupervised, then parents should really be warning them about the possible dangers on services like social media.
But aside from education there are technical things you can do to make sure that your kids don’t see things that they shouldn’t. You can create a guest network specifically for your kids, as outlined previously, but you can also block access to certain categories of website for their specific network. For example if you have a guest network called ‘my_network_name_kids’ you can block access to virtually any site you wish on the network by using your router's management console.

ISP’s have made it easier than ever to block access to adult content. Providers like Sky have the ‘broadband shield’ enabled by default, which blocks access to adult content and gambling sites. However kids are very clever and can get around this fairly easily, so it’s best to take matters into your own hands.
The best way to stop your kids seeing things they shouldn’t is to restrict internet access to their guest network, refrain from telling them your main password under any circumstances and to make sure you block access to proxy services using your router's management console. This prevents the vast majority of workarounds and your children can use the web safely.
Again, it’s important to educate your children so they can use the web safely. Don’t leave it to ISPs or hardware manufacturers.
So to summarise how to best set up your home network:
- Log in and change all default names and passwords on your router
- Give your network a unique name (SSID)
- Set up guest networks for visitors
- If you have children set up other guest networks specifically for them
- Block access to Adult content and proxies on this network
- Keep the login details for the main network safe
Find a Deal


Last updated on the 20th of May at 6:05am with 154 deals.